Are you ready to take your online store to the next level?
If so, you’re in the right place! In today’s digital age, having a seamless e-commerce platform is essential for success. When setting up an online store with ease and efficiency, WooCommerce in WordPress is the ultimate solution.
Get ready to learn how to harness the power of WooCommerce Hosting and WordPress Hosting to create a dynamic and profitable online store that stands out.

Benefits of using WooCommerce for your online store
Looking to take your online store to the next level? WooCommerce is the perfect solution for turning your WordPress website into a fully functional e-commerce powerhouse. With WooCommerce, you can easily set up and manage your online store without hassle.
One of the main advantages of using WooCommerce is its flexibility and customization options. You have full control over the appearance and functionality of your store, enabling you to create a distinctive shopping experience for your customers. Whether you’re selling physical products, digital downloads, or services, WooCommerce can meet your needs.
Another advantage of using WooCommerce is its seamless integration with WordPress. Since both platforms are open-source and constantly updated by a large community of developers, you can rest assured that your online store will always be secure and up-to-date.
WooCommerce offers an extensive range of extensions and plugins to improve your store’s functionality, including payment gateways and shipping calculators. There are endless possibilities for enhancing your e-commerce platform.
How to Set Up WooCommerce in WordPress
Step 1: Installing the WooCommerce Plugin
- 1. Log in to your WordPress dashboard and go to Plugins > Add New.
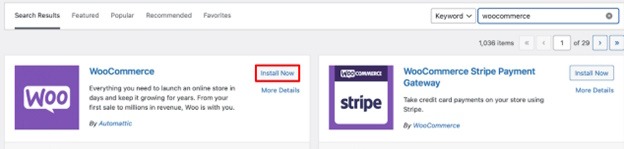
- 2. Search “WooCommerce” and hit Enter.
- 3. Click on “Install Now”.
- 4. Once the installation completes, click the Activate button to activate the plugin.
Step 2: Access the Setup Wizard
After installing WooCommerce, you’ll be prompted to go through a setup wizard. While optional, it’s recommended to complete it to configure some key settings.
Enter essential store information, such as the address. Note that any settings you configure here or in the setup wizard can be modified later in your WooCommerce settings.
Step 3: Add Products to Your Online Store
After clicking the final “Continue” button in the setup wizard, you will be redirected to your WordPress dashboard. If you choose to enhance your site with the free Jetpack plugin, you will be prompted to set up Jetpack on your site.
Feel free to postpone this step. Instead, go to the new WooCommerce tab in your dashboard. Even if you’ve already entered your business details in the setup wizard, you’ll find a checklist here to help you set up your online store.
First, to add products to your website, click “Add products” from the setup screen.
You can add new products by navigating to the Products tab in the sidebar of your WordPress dashboard, and then clicking on Products > Add New.
You’ll be prompted to choose the type of product you want to create, such as physical products, digital products, variable products, and more. After making your selection, you’ll be taken to the Edit product page.
The first step is to create a title and a brief product description. After that, save the draft, and you’ll see a “Preview product” link.
Adding Key Details to Your Product
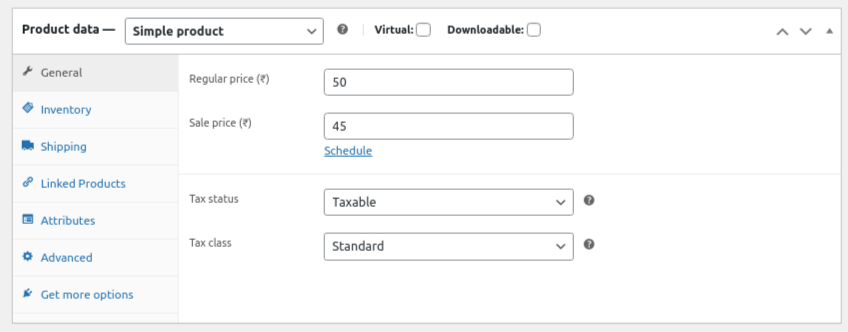
When you scroll down below the post editor, you’ll see two new widgets that are not found on regular posts or pages. The first is the Product Data section:
Here, you can specify whether the product is virtual and downloadable at the top. In the General tab, you can input the regular and sale prices.
If you’re selling digital products, you’ll need to upload the file for purchase, set the download limit (leave it blank for unlimited downloads), and specify the download expiry (leave it blank for permanent availability).
Next, in the Inventory tab, you can manage your stock by entering the product quantity, stock status (in/out of stock), and whether you want to allow backorders.
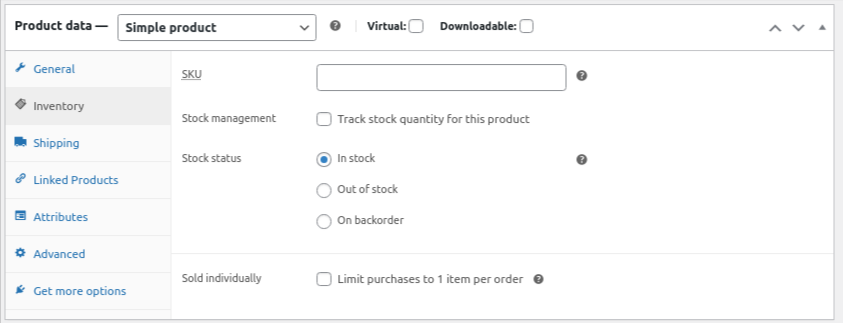
You can mark the product as available for individual sale, meaning only one can be purchased in a single order. This is also where you can input the product’s SKU (identification number), if applicable.
Several other valuable tabs are available. The Shipping section allows you to enter the item’s weight, dimensions, and shipping class:
In the Linked Products tab, you can add upsells and cross-sells, while Attributes lets you describe the product’s characteristics.
In the Advanced tab, you can enter custom purchase notes, set the product’s position in your menu, and enable or disable reviews. You can also view recommended extensions under the Get More Options screen.
Create Attributes and Variable Products
WooCommerce offers plenty of options for adding details and customizing your products. The Product Data section offers attributes and variable products, two of the most useful options.
Attributes are vital descriptors that provide potential customers with important information about your product. These might include the item’s color, material, size, type, and more.
When you add these details to your product in the Attributes tab, they will appear on the product page under Additional Information:
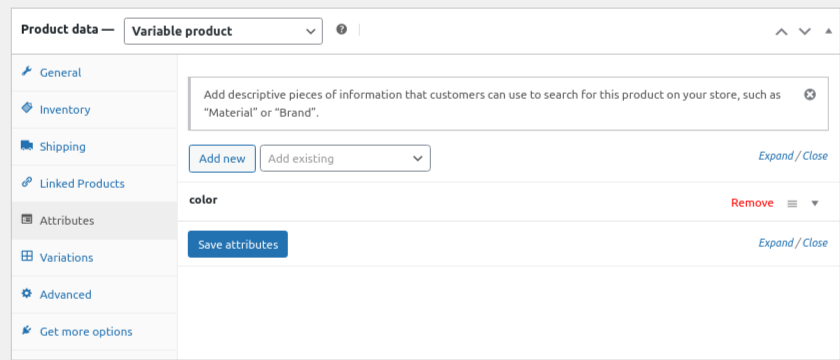
No matter what type of products you’re selling, attributes are essential for conveying important characteristics. But what if your items come in multiple variations?
In this case, you should choose the “Variable product” option from the Product Data dropdown menu:
Managing Your WooCommerce Products
As your WooCommerce store grows, you’ll need an efficient way to manage your products. Thankfully, you can do this through the Products tab in your dashboard.
By selecting “All Products,” you can view every item currently listed in your store. From here, you can easily add, edit, and delete products as needed.
Within the Products section, you can also view your product categories, tags, attributes, and reviews. Each page resembles the standard WordPress Posts > Categories page and helps you keep your entire inventory organized.
Step 4: Choose Your Payment Processors
Now, return to your WooCommerce page and continue working through the store checklist. With your store details completed and some products added, it’s time to decide which payment options to enable.
You can either click on the “Set up WooCommerce Payments” link from the setup page or go to the Payments tab in your dashboard.
Click “Finish setup” to start accepting credit card payments in your store.
Next, choose any additional payment options you want, and WooCommerce will handle the setup. You can also utilize extensions to incorporate more payment processors into your store.
Step 5: Personalize Your WooCommerce Store
As you near completion of setting up your WooCommerce store, take a moment to personalize it by returning to the WooCommerce setup page and selecting “Personalize your store”.
If your store doesn’t have many products yet, you can click on “Import products” to get a better sense of your site’s final appearance.
Next, create a custom homepage for your store by clicking on the “Create homepage” button:
You can further brand your WooCommerce store by uploading a logo from your computer and setting a store notice to display across all site pages. Click on “Complete task” to finalize these customizations.
If you haven’t already verified your business details, you’ll be prompted to do so now. Afterwards, you can begin managing WooCommerce transactions. Your WooCommerce store is now ready to go live.
Tips for Optimizing Your WooCommerce Store
When optimizing your WooCommerce store, it is important to consider several key tips. Ensure that your website is mobile-responsive.
With the growing number of users shopping on their phones, having a mobile-friendly site is essential for maximizing sales. Optimize your product images, high-quality visuals can significantly impact a customer’s purchasing decision. Ensure your images are clear, properly sized, and load quickly on all devices. Additionally, utilize SEO strategies to drive organic traffic to your store. Conduct keyword research and optimize your product descriptions and meta tags accordingly. This will improve your store’s visibility in search engine results.
Moreover, a caching solution should be considered to improve page loading times. A fast-loading website not only enhances user experience but also boosts SEO rankings.
Monitor and regularly analyze your store’s performance using analytics tools. This data can provide valuable insights into customer behavior and help you make informed decisions about further optimization efforts.
Troubleshooting Common Issues
Encountering challenges while setting up your WooCommerce store can be frustrating, but many common issues have straightforward solutions. One frequent problem involves payment gateway errors; ensuring your settings are correctly configured can often resolve this issue.
Another common issue concerns shipping calculations. Double-check that your shipping methods are set up correctly in WooCommerce settings.
If products aren’t appearing on your storefront, verify that they are published and not hidden or out of stock. Slow loading times may be due to large image files; optimize images for the web to improve site speed.
In cases of plugin conflicts, deactivate plugins one by one to identify the one causing the issue.
Conclusion
Setting up WooCommerce in WordPress provides a powerful means to create and manage your online store efficiently. With its intuitive interface, customizable features, and seamless integration with WordPress, WooCommerce offers a robust platform for selling products and services online. By following a step-by-step guide, customizing your storefront, effectively managing orders and inventory, optimizing your store for improved performance, and addressing common issues that may arise, you can establish a successful e-commerce venture with WooCommerce hosting on WordPress. Harness the potential of WooCommerce to elevate your online store, delivering customers a seamless shopping experience and reaching new heights in e-commerce.