How to Sync the Samsung Galaxy S II via USB

We just received our new Galaxy S II (what an amazing device!), and wanted to share the specific procedures you’ll need to follow to sync via USB using CompanionLink and Dejaoffice.

The Galaxy S II performs a bit differently than other devices, so you’ll need to follow these specific steps if you want to sync via USB. You also may want to consider syncing the Galaxy S II via Wi-Fi, as it is not subject to any of these limitations.

When syncing via USB, DejaOffice normally connects the device’s USB storage drive automatically, but on the Galaxy S II the automatic connection does not work. Follow these instructions before each sync:

  • 1. First, ensure that the phone is disconnected from the PC.
  • 2. On the Galaxy S II, open Settings > Wireless and Network > USB Utilities.
  • 3. Select “Connect storage to PC”.
  • 4. Make sure CompanionLink is running on the PC, then connect the Galaxy S II to the PC using a USB cable.
  • 5. Open DejaOffice, then tap “Sync” to begin.

We’re working in a more automated method, but for now follow the steps above. Once again, our local Wi-Fi sync is fully automatic and is not subject to any of these restrictions. Questions? Comments? Let us know below!

Support Update: BlackBerry Sync Issue

CompanionLink is aware of an issue with certain BlackBerry devices where the device’s address book will show only one contact, duplicated several times, after synchronizing. All other contacts do not display on the device even though they may be present in the device’s internal database.

Update:

We have found this is associated with the December 2010 update to Blackberry 5.0 OS in from various carriers. This includes, but is not necessarily limited to, Blackberry OS 5.0.0.1015, 5.0.0.1030, and 5.0.0.1067.

Other updates do not appear to have this problem. Blackberry OS 4.0 and 6.0 work fine, as do prior Blackberry OS 5.0 releases. The problem is not unique to CompanionLink. It is reported with other sync products including products from RIM.

Please note your Blackberry OS version carefully. Check your carrier’s website or BlackBerry for an OS update that is PRIOR to December 2010. Please install the older OS. This will likely fix the display problem.

NOTE: If you are unable to downgrade your Blackberry OS, the following steps appear to usually resolve the issue:

1) Perform a full backup of your Blackberry.
2) Perform a security wipe of your Blackberry.
3) Restore the backup you created in step 1).

If you are still in need of assistance, contact technical support at www.companionlink.com/support/contact.html

Support Update: How to Sync the DROID Incredible 2 With Your PC

HTC recently released their follow-up to last year’s very popular DROID Incredible. Aptly named the DROID Incredible 2, this Android-powered handheld is a solid update from last year’s model. The HTC DROID Incredible 2 features a 4” display, a 1GHz processor, 768MB of RAM, and an 8-megapixel camera. The phone ships running Android 2.2 with HTC Sense. All in all it’s a great device and a worthy competitor among today’s top mobile phones. For early reactions to the device, as well as some detailed photos, check out Android Central’s initial review.

Such a great device is bound to be quite popular. As such, we’re happy to inform all you prospective buyers and new owners that CompanionLink fully supports syncing contacts, calendar, tasks and notes between the Incredible 2 and PC software such as Microsoft Outlook, ACT! by Sage, Palm Desktop, Lotus Notes and more. You can sync direct via USB, over your local Wi-Fi network, via our Secure Hosted Wireless service, or wirelessly through Google. To learn more, as well as download a 14-day free trial, visit https://www.companionlink.com/phones/htc-incredible.html

An Update On Syncing The BlackBerry PlayBook

If you’re one of the many who got their hands on a PlayBook this past week, I’m sure you’re well aware of its current lake of contacts, calendars, etc. While these thing should be coming via software updates, they aren’t here yet. So, in the meantime, what do you do if you want to sync Outlook to the BlackBerry PlayBook? We currently have a few options for you:

1. If you own a BlackBerry phone, you can sync Outlook to your BlackBerry via CompanionLink for Outlook. Then, simply launch the BlackBerry Bridge app and pair it up with the PlayBook. All the contacts, calendars, tasks, & memos you synced to your BlackBerry phone will now be available on the PlayBook for as long as the connection remains open. We realize that this is not the most direct route, but it’s the most integrated option available to us at the moment.

2. If you do not own a BlackBerry phone, or want to be able to access your contacts and calendars without having to use the Bridge app, you can use CompanionLink for Outlook to sync Outlook to Google. Once the sync is complete, you can use the browser on the PlayBook to navigate to Google’s web apps. This, of course, requires a data connection to load.

Future software updates for the PlayBook are expected to bring integrated contacts, calendars, tasks, and memos to the device. At that point, we anticipate users will be able to sync via CompanionLink and the BlackBerry Desktop software as is currently done with BlackBerry phones. Additionally, Research In Motion (RIM) has stated that the PlayBook will ultimately be able to run Android apps. When this functionality becomes available, we are expecting that DejaOffice will be able to run natively on the PlayBook, further expanding the sync options available.

If you have any questions on your current sync options or our anticipated future sync options, leave a comment below or get in touch on Twitter or Facebook!

How to Sync Windows Phone 7 with Outlook


A number of years ago, Windows Mobile 6.5 was released to the public. Though it had its quirks, the Windows Mobile platform gathered a small but loyal following of business professionals and productivity enthusiasts. Perhaps the biggest reason for this following was just how easy the platform made it to sync with Microsoft Outlook.

When Microsoft released Windows Phone 7 last year, they completely revamped the interface to make it much easier to interact with. Some would even say they’ve made it pretty. At this time, many existing Windows Mobile owners assumed that Outlook sync would work the same way it had before. It didn’t. Disappointed, confused, and upset are only a few of the words that would describe the general reaction to the situation. Amazingly, Microsoft offers no method to sync Windows Phone 7 to Outlook directly via USB.

What are Windows Phone 7 owners supposed to do? Microsoft offers two official solutions: Sync via a hosted Exchange server or use the Outlook Hotmail Connector. Exchange setup is fairly straightforward – if you have an Exchange server, that is. For those who don’t, the Outlook Hotmail Connecter is the only other option from Microsoft. This option requires you to sync your Outlook data to Windows Live/Hotmail, which then wirelessly syncs to your phone. Both options limit you to syncing contacts and calendars only.

While current Windows Phone 7 API’s prevent CompanionLink from providing a direct sync option, we can sync Outlook to Windows Phone 7 devices via Google. This option offers advanced wireless sync of contacts and calendars, as well as tasks and categories. We sync your Outlook tasks to the calendar as untimed entries, and we sync Outlook contact categories as Google Groups. Once CompanionLink syncs your data to your Google account, it is automatically synced to your phone, courtesy of Google. This happens through your phone’s wireless data connection. Two-way sync is fully supported too, so you can make changes from anywhere.

To get started, simply download CompanionLink for Outlook and configure it with your Google username and password. Detailed setup instructions can be found on our support page. Next, set up your Windows Phone 7 device to sync with your Google account and you’ll be done. It’s that simple!

We’ll be keeping an eye on the Windows Phone platform. With any luck, perhaps a future update will allow developers such as ourselves to implement a more robust sync solution.

If you have any questions, please let us know in the comments.

DejaOffice for Android v1.11 Adds Powerful New Grouping Feature

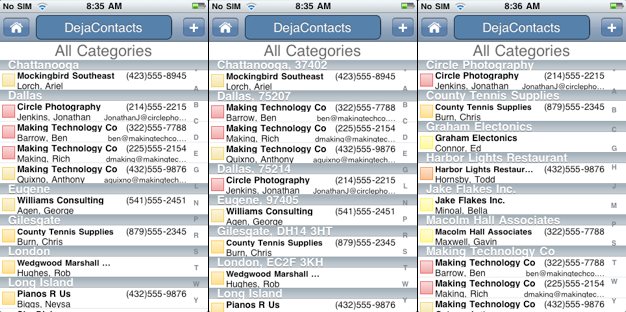
DejaOffice for Android v1.11 is now in beta, and available for direct download at dejaoffice.com/androidapp. The newest  DejaOffice update includes a powerful new grouping feature that allows you to group your data by a variety of fields. For example, you can now group your contacts by category, company name, or city.

Group Contacts by Category Group Contacts by City Group Contacts by Company

This is an incredibly robust feature that is sure to save time and help you organize better. I’ve spoken to sales guys who travel around the country, and they’ve often said that it would be helpful to be able to fly into a city (say Denver) and pull up a list of contacts from that city. Easy. Or imagine that you want to quickly view all your contacts that work at Intel. Done.

We’re pretty excited about the new grouping feature. To download the latest beta of DejaOffice, point your Android browser at dejaoffice.com/androidapp. Let us know what you think in the comments below!


Support Update: CompanionLink Build 4036 Now Available

CompanionLink build 4036 is now available on our updates page. This update addresses a USB sync error that affects a small number of devices when syncing with the latest version of DejaOffice for Android. If you have experienced the following, please update now:

– USB drive mounts to the PC properly and the user is able to read/write data to it, but CompanionLink never starts a sync
– Previously able to sync with build 4033 and earlier
– Only the very first USB sync works after deleting the companionlink.db file and starting over

AES-256 Security: Now Standard in CompanionLink & DejaOffice


Whether it’s a company requirement, an industry standard practice, or a personal preference, many users find their wireless sync options limited by the lack of secure solutions available to them. Most cloud-based systems are not an option as user data is stored on an outside server. Even local Wi-Fi can be an issue if the data is not securely transferred.

At CompanionLink, we take data security very seriously. Keeping your data in sync is our end goal, but keeping it safe in the process is extremely important as well. That’s why we’re now using AES-256 Security in the latest versions of CompanionLink and DejaOffice for Android (and iOS soon). So just how secure is AES-256 Security? Let’s take a look.

AES stands for Advanced Encryption Standard, and the number 256 refers to the number of bits in the key size. Bits? Keys? I know, it sounds technical – and it is! If you’d like to read up on all the specifics of AES-256 Security, I’ll refer you to other online sources. With that said, let’s get back to explaining just how safe your data is under this security protocol. I’d like to refer to a quote from the Computer Security Division of the National Institute of Standards and Technology stating:

“The design and strength of all key lengths of the AES algorithm (i.e., 128, 192 and 256) are sufficient to protect classified information up to the SECRET level. TOP SECRET information will require use of either the 192 or 256 key lengths.”

In a nutshell, the NSA considers AES-256 secure enough to protect TOP SECRET classified information. Data doesn’t get much more secure than that. With AES-256 Security built in, you can rest assured knowing that your data is secure with CompanionLink and DejaOffice!

DejaTasks Now Supports Recurring Tasks (DejaOffice 1.10, part 4)

Welcome to the final installment in our series of posts explaining in greater detail some of the new features in DejaOffice 1.10.6 for Android. Find the other parts of this series here: part 1 (widgets), part 2 (global search), part 3 (DejaCal).

We are pleased to announce support for recurring tasks in DejaOffice! I’m sure this is a very welcome feature among many of our users. Whether you need a reminder to send out a weekly report, to schedule a monthly meeting, or to ensure you send out a birthday card to an important client every year, the new recurring tasks feature is sure to save you time.


To schedule a recurring task, simply open DejaTasks and create a new task. You’ll notice a new “Recurrence” option, which allows you to set the task to recur daily, weekly, monthly by day or date, and yearly by day or date. You can then choose if (and when) you’d like the recurrence to end. Finish adding the details to your task, tap save, and you’re done! Should you need to edit a recurring task, tap the edit button on a task as you normally would and change the “Recurrence” field. It’s that simple!

DejaOffice 1.10.6 was a major release for our Android app. This recent series of blog posts has highlighted some of the main features we’ve added, and has hopefully given you a better understanding of how to use the new features. If you have any further questions on how the new features work, let us know!

Of course, we’re hard at work to add even more. Do you have a feature you’d like to see? Let us know in the comments or head over to our DejaOffice forums!

DejaCal Receives a New UI and Date Picker (DejaOffice 1.10, part 3)

Welcome to part 3 of 4 in our mini-series that explains in greater detail some of the new features in DejaOffice 1.10.6 for Android. Be sure to read part 1 (widgets) and part 2 (global search) as well!

If you’ve been a longtime user of DejaOffice, you’re bound to appreciate the improvements we’ve made on the look and feel of DejaCal. With a refreshed UI, we feel the calendar is more efficient and better looking than ever! The look and feel is not the only change we’ve brought to DejaCal, however. We have also introduced a PalmOS style date picker.


The new PalmOS style date picker is sure to be a hit. While Android has many great features, allowing you to quickly pick the date and time for an event is not its strongest one. That’s why we rebuilt the date picker for DejaOffice. If you’ve used a PalmOS device in the past, you’ll find this looks familiar. With this new format, you’re able to quickly select a date and time and move on. When it comes to mobile productivity, accomplishing something in the fewest possible steps is important. We think the newly designed date picker goes a long way in doing just that!

Tomorrow, I’ll wrap up this series of updates with a post on how we’ve implemented recurring tasks, and how you can best use them!

DejaOffice Gains Global Search on Android (DejaOffice 1.10, part 2)

Today’s post is part 2 of a 4 part series that explains in greater detail some of the new features in DejaOffice 1.10.6 for Android. To read part 1, which discusses the new widgets, click here.

Global search is a very useful feature in Android. It allows you to search through items on your phone, as well as online. Many applications support global search, allowing you to easily search through their data from the main search bar. This is an extremely convenient feature to have, especially when you have a lot of data that you’d like to access quickly. As such, we’ve added support for global search to DejaOffice!

To get started, you’ll need to make sure DejaOffice data is included in search results. To do so, simply tap the search key on your phone. Next, click the Google icon in the top left corner. This will display what types of information you are currently searching for when you use global search. To add DejaOffice to this list, tap the settings icon on the right side of this screen. Scroll to DejaOffice in the resulting list and tap the checkbox to enable it. Now, a simple tap on the search key is all it takes to quickly jump to a contact, task, or calendar event! To have the search single out DejaOffice data, simply tap the Google icon in the top left, then select the DejaOffice icon.

Be sure to check back in tomorrow to learn about the major UI improvements we’ve made to DejaCal. I have a feeling you’re going to love our new date picker!

Introducing DejaToday Widgets for Android (DejaOffice 1.10, part 1)

DejaOffice 1.10 for Android is a significant update. We’ve added a number of major new features and, as such, wanted to take the time to go through a few of them in greater detail. Over the next few days, I’ll be highlighting the following new features: Widgets, Global Search, Calendar Improvements, and Recurring Tasks.

Today, I want to focus on widgets. Widgets are a great way to add “at-a-glance” information to your Android’s home screens. They come in many varieties, from clocks to weather to e-mail and much more. So what do our widgets do? They display your DejaToday information. Today’s calendar events and tasks, as well as any contacts related to these activities, are displayed on either a 4×1 “marquee” style widget or a large, 4×4 overview widget.  We designed these widgets to help you be even more productive on the go. A quick glance at your home screen is all it takes for you to keep tabs on your schedule! Additional details regarding any of the activities displayed in the widget are only a touch away.


To add a DejaOffice widget, simply tap and hold on any empty spot on your home screen, select “widgets” from the popup, and choose either the “DejaToday 4×1” or “DejaToday 4×4” widget. Then, sit back and enjoy have easy access to all your important information!

We hope you find these new widgets as useful as we do! If you have any questions on how they work, or have feature suggestions for future updates, please let us know! And be sure to check back tomorrow to learn about the new Global Search feature in DejaOffice 1.10!

DejaOffice 1.10.6 Now Available In The Android Marketplace

We are happy to announce the release of DejaOffice v1.10.6 for Android. This update follows a series of beta releases and brings numerous additions, improvements, and bug fixes to DejaOffice. Major features introduced in DejaOffice v1.10 include:

  • Added DejaToday widgets
  • Added support for recurring tasks
  • Added Global search
  • Added DejaExpense mini-app
  • New PalmOS style date picker
  • Major calendar UI improvements

Of course, there are even more great features, improvements, and bug fixes included in 1.10.6. Over the next week or so, we’ll be highlighting some of these features in blog posts, explaining how to get the most out of each new feature. In the meantime, be sure to go download the latest version today!

New Online Knowledge Base Makes Using CompanionLink Easier Than Ever

CompanionLink is pleased to announce the launch of our new support knowledge base (KB). Our goal to make public the sync and configuration expertise that we have in-house. We’ll be sharing setup guides, tips & tricks, productivity tweaks, and more. Over time, the KB will grow, adding additional setup guides for existing devices, as well as guides for new devices as they are released.

Currently, the KB features easy-to-use setup guides for Apple and Android devices. Learn how to sync your new Nexus S to Outlook. Or, learn how to sync ACT! data to the Verizon iPhone. Whatever your setup is, we’ll show you how to get everything up and running. Just visit www.companionlink.com/support/kb. Then, simply choose your device and sync method and you’ll be directed through detailed steps, photos, and videos showing you exactly how to configure CompanionLink and DejaOffice.

We will be expanding the KB in the future in an effort to better serve CompanionLink and DejaOffice users!

Syncing with the Palm Pre 2 and webOS 2.0

Sync with the Palm Pre 2

Update: USB sync is now live for all webOS devices! Read about it here.

The recently released Palm Pre 2 ships with the latest version of the HP/Palm webOS operating system, webOS 2.0. Due to core changes in the underlying operating system, CompanionLink’s USB sync is currently not compatible with webOS 2.0 devices like the Palm Pre 2.

CompanionLink’s current recommendation is to sync the Palm Pre 2 via Google. CompanionLink syncs your PC data with any Google or Gmail account. Google then syncs automatically with the Palm Pre 2 over a wireless data connection. Two-way sync is fully supported.

CompanionLink plans to update our USB sync software for webOS devices in the near future to support webOS 2.0. Inquiries about compatibility with the Palm Pre 2 should be directed to support@companionlink.com.

Tech Tip: How to sync multiple Outlook folders with your phone or Google account

Many users often call us asking how they can sync if they have data in more than one Outlook folder. Using the Category Manager feature in CompanionLink Professional, this can easily be accomplished. The reason we have to use the Category Manager is because most phones do not include support for multiple contact folders, and so instead we tag all the contacts from each folder with a different category. On most phones you can filter your contact list by category for easy separation (or at least view the category so you know what type of contact it is).

For example, say I have two folders in Outlook – Friends and Enemies – that I want to sync with a Google account (or a phone, the procedure is the same). Configure CompanionLink normally with your Google account settings. In the Outlook configuration settings, just choose one of the two folders we’ll be syncing with. When you’ve gone through the initial Outlook setup, hit the Category Manager button.

First, select the conduit you wish to modify (contacts, calendar, etc.), then select the Create New Category button. Name this category however you wish it to appear on the phone/Google account (I’m starting with “Friends”). Be careful when creating a category that you do not give it same name as an existing Outlook category, as this will cause trouble down the road. You will see your custom category listed under the conduit you’ve selected.

Now we have to point this category to the matching Outlook folder. Select your newly created category and tap Application Settings, then click Yes. In the popup window, select Outlook once more, and then you will be given a choice of Outlook folders to sync with. Select the Outlook folder that matches the category you’ve just created (Friends), then hit OK.

You should now be back at the Category Manager window. Tap Create New Category to create your second category (Enemies), then follow the above steps for each additional Outlook folder you wish to sync with. Once you’ve set up two or more categories, it should look something like this:

Hit OK, and you’re ready to sync! Go ahead and tap the Synchronize button to begin syncing with your phone/Google account. If you want to create a new contact from your phone or Google account, just make sure to apply the category that matches the Outlook folder you want them to appear in, and they will happily sync back to Outlook in the correct folder.

To sync with multiple Outlook folders, make sure you are using CompanionLink Professional (download a free trial). The category manager can be a bit tricky, especially if you are dealing with large amounts of data. If you need any help getting things set up, please contact our tech support team and we will be happy to assist.