Sync the Kindle Fire with ACT!

Is the Kindle Fire the “iPad killer” that many proclaimed it would be? Maybe not quite. But I think it’s a great device at a great price, and quite a few people agree with me it would seem. With an estimated 5.5 million Fires sold last quarter, it’s safe to say this is one hot tablet! But how do you make this great little tablet work for you when it comes time to get down to business? That’s where CompanionLink comes in!

Syncing the Kindle Fire with ACT! is made easy with CompanionLink. You’ll need DejaOffice on your Kindle Fire to get started, so grab it from the Amazon Appstore if you haven’t already. It’s free.
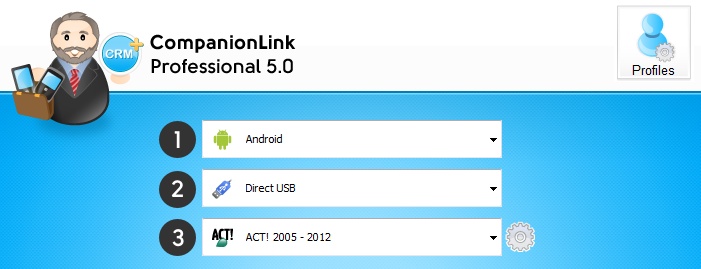
Once you’re set up with DejaOffice, you’ll need to ensure you have either CompanionLink Express (download | upgrade) or CompanionLink Professional (download | upgrade) installed on your computer. Then, simply select Android as your device in the CompanionLink setup window. Next, choose your sync method. We offer Direct USB sync, Local WiFi sync, and Secure Hosted Wireless sync. Finally, select ACT! as your database and configure as desired. For full setup instructions for ACT!, click here.

So there you have it – a quick and easy way to sync ACT! with the Kindle Fire. Now you can take your data with you, wherever you need it.
How To Sync The Kindle Fire With Google

The Kindle Fire doesn’t allow you to sync your Google Contacts and Calendar, but CompanionLink does! Here’s a quick guide on exactly how to do it:

  1. Download DejaOffice for free from the Amazon Appstore.
  2. Install CompanionLink for Google on your computer. This works with DejaOffice to sync Kindle with Google.
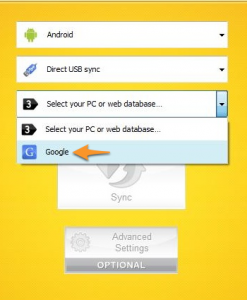
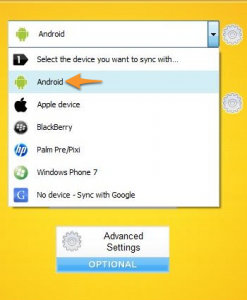
  3. In CompanionLink configuration, select Android as your device.
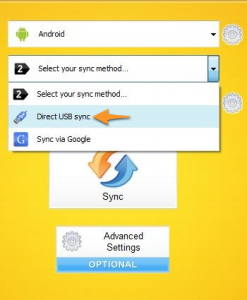
  4. Select Direct USB as your sync method.
  5. Select Google as your database from the final drop-down list.
  6. Follow the setup wizard in DejaOffice and you’ll be syncing in no time.

Note: Due to the way USB currently connects to the Kindle Fire, you’ll need to follow a specific pattern to begin the sync:

  1. Connect the USB cord to your Kindle Fire
  2. Unmount the SD card via the Notification Tray on the Kindle Fire
  3. Open DejaOffice
  4. Tap Sync

That’s it! So, whether you are the proud owner of a Kindle Fire today or are hoping to get one soon, rest assured that we’ve got you covered when it comes to syncing your data!

CompanionLink for Google comes with a free 14-day trial. When you’re ready to buy, use the affinity code SYNCKINDLE and you’ll pay just $39.95. If you already own CompanionLink 5 for Google, just make sure you have the latest version by checking our updates page.

Give the Kindle Fire a Productivity Boost with DejaOffice!

Image credit: AmazonWe just finished putting the Kindle Fire through its paces, testing both CompanionLink and DejaOffice on the affordable new tablet from Amazon. The results? DejaOffice runs well, and sync with the Kindle Fire works perfectly!

In fact, everything is working as we expected, with the exception of USB sync, which requires a small, but simple workaround. The Kindle Fire automatically mounts its SD card. You must Disconnect from USB Storage, then open DejaOffice and hit sync. We’re looking into a fix to eliminate this step, however.

After testing the Kindle Fire, I think it is important to remember that it’s first and foremost a Kindle – great for consuming media. But with a few easily downloaded apps like DejaOffice, you’ll have transformed your Kindle Fire into a business machine, filled with your contacts, calendars, tasks, memos, and more.